Project 0003: SDG2042X GUI v0.2.* — first patch round and bug tracker setup

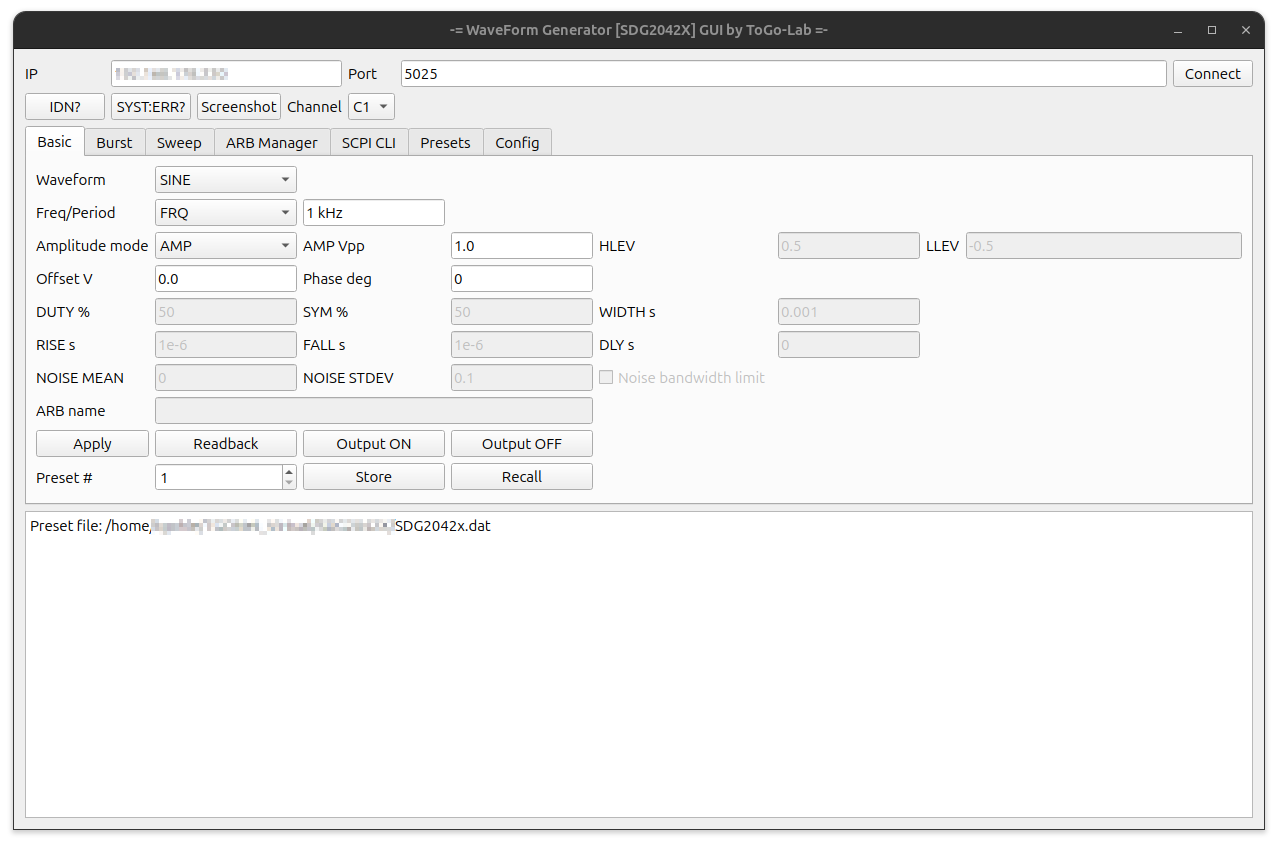
The current work on my Linux GUI for the Siglent SDG2042X is about findig bugs before piling more features on top.

Version 0.1 already did the basics: Waveform control, burst and sweep settings, ARB handling, presets, a small SCPI console, and screenshot support. But no software without bugs. So besides the first code fixes, I also set up a proper issue tracker for the project in Gitea (this was also a point in my gitea learning 2Do List). The repository now has labels, issue templates, a small board workflow, and the first full review list entered as issues. For this first round, I started with the items that looked most worth fixing immediately: #1, #2, & #12. I also did #6 as it was a little bit annoing thing.

The code side for those is already done in v0.2 in this git. What is still open is real verification against the actual SDG hardware before I close them.

Current issue list

Find this in the Gitea: https://gitea.togo-lab.io/tgohle/0003-SDG2042X-PyQt-GUI-for-Linux/issues

Status of the project is now (18.04.2026):

I wrote and ran a small test script for issues #1, #2, #6, and #12, plus a final hardware check on the SDG itself: https://gitea.togo-lab.io/tgohle/0003-SDG2042X-PyQt-GUI-for-Linux/src/branch/master/script/archive/V0.2 That gives me enough confidence to close all four issues and move this first bug-fix round a step further toward done.

  • bug tracker is set up in Gitea, including milestone for v0.2
  • the full first review list is in the tracker
  • the first four fixes (1,2,6 & 12) are already coded and l loaded up to this git
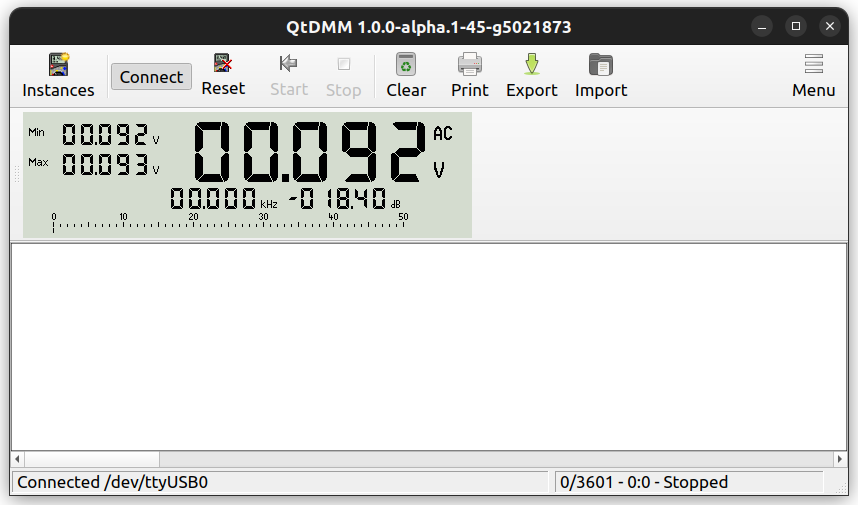
  • tested with script, passed.
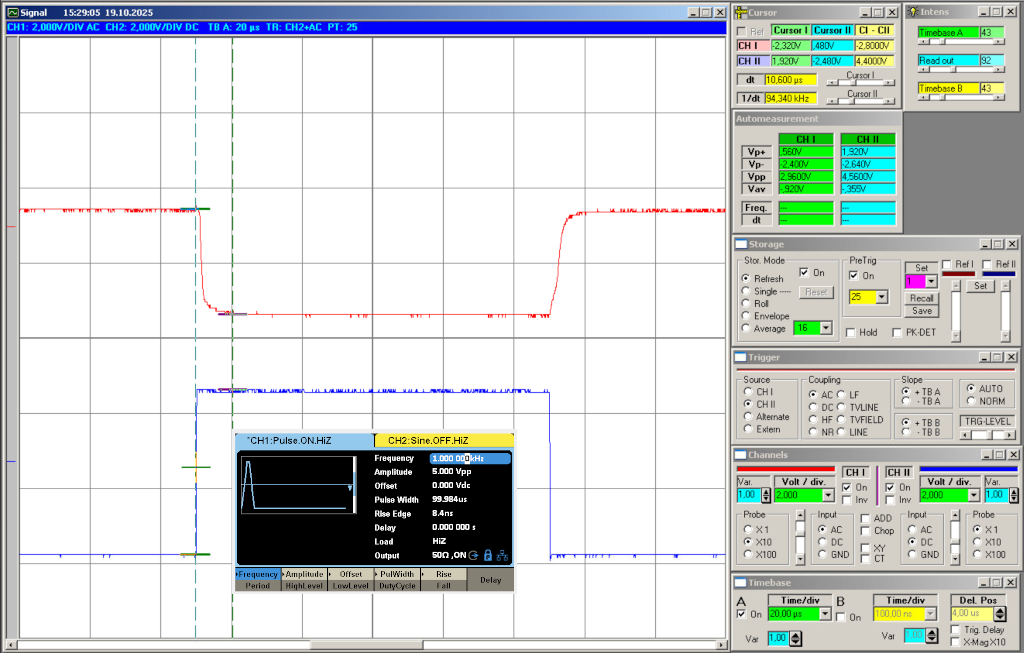
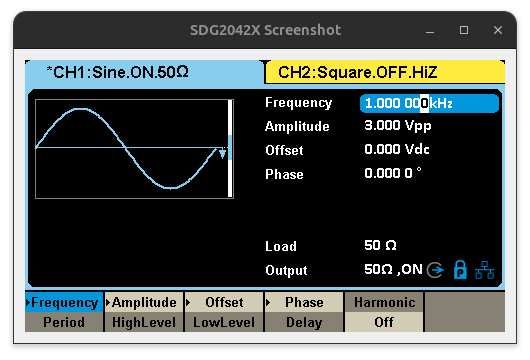
  • hardware verification for issue 2 done

Not exciting, but necessary: the tedious grind of bugfix work, so the front end becomes handy enough that it does not get in the way of my other hobby projects.

Further bug and issue work will only tracked in the issue tracker.


Update 20.04.2026 Bug-fix round for the SDG2042X Linux GUI

A productive bug-fix day on the SDG2042X GUI for Linux.
The focus was on medium-severity issues around ARB handling, sweep robustness, preset handling, and input validation.

  • #15 — ARB download response parser fails on real SDG
  • #10 — Sweep fallback from WAV to SPAC is timing-fragile
  • #9 — Preset recall ignores current channel selection
  • #8 — Preset file path selection is not propagated back to Main
  • #3human_to_eng() silently accepts ambiguous m suffix

Details in the closed section of the gitea: https://gitea.togo-lab.io/tgohle/0003-SDG2042X-PyQt-GUI-for-Linux/issues?type=all&state=closed

Version progression during this round

  • v0.2.1 → Bug #15
  • v0.2.2 → Bug #10
  • later working copy → Bug #9 and Bug #8
  • v0.2.6 → Bug #3

Summary

This round cleaned up several of the more annoying reliability and usability problems in the GUI: better ARB handling on real hardware, safer sweep fallback, more reliable preset behaviour, and stricter input validation where silent misinterpretation would be risky. Overall, a good step toward making the GUI more dependable as an actual bench tool instead of just a nice front-end.

電力番長 Denryoku Banchō – a MightyWatt Linux CLI

Since I’m currently in the process of redesigning and updating the setup of my electronics lab, I no longer want to keep Windows around just to run my electronic load I own now for 10 years: The famous MightyWatt.

So this fork moves the project where it fits better to my actual lab setup: Into my Linux environment, closer to my usual tools, and I hope much easier to automate. The current focus is the CLI backend. That is the useful part for headless operation, scripting, CSV logging, JSON-driven test runs, and remote access. A GUI may come later, but only as a second layer. First the engine, then maybe the dashboard. The name 電力番長 (Denryoku Banchō) fits that idea well: the CLI sits on the hardware, owns the usb link, and acts as the boss in the background.

But first: A big thank you is due to the original MightyWatt developer, Jakub Polonský (kaktus85) whose MightyWatt repositories remain the foundation this work builds on. The original GitHub project pages are here: MightyWatt (that’s the one I own) and MightyWatt R3.

My Linux-native fork lives here: 0005-DenryokuBancho on ToGo-Lab Gitea which you also can access it via one of my landing pages.

This blog post will be updated as the project progresses. Beta 0.1 is now available in my Gitea repository. It is already running, but it still needs proper testing in the next stages of the project.

PC817 Optocoupler Tester – Lazy Sunday Afternoon Project

For some upcoming projects, I’ll use the PC817 optocoupler family. But sadly, you don’t always get what you think you’ve bought. So how can you simply check if they work as described in the datasheet? I wanted a quick way to verify parts before building them in.

This small tester consists of two independent circuits, runs on 5 V, and does two simple things:

  1. Quick Test – Push the switch, and if the LED lights, the optocoupler basically works.
OptoCoupler_CheckCircuit_QuickManual
  1. Frequency Test – Based on the circuit from the datasheet. Input impedance is 50 Ω, and the output can be pulled up with 100 Ω, 1 kΩ, or 10 kΩ to see how the device behaves at different frequencies.
OptoCoupler_CheckCircuit_ParameterCheck

Simple stripboard:

0002-PC817-Series-PhotoCoupler-Tester_SB

That’s it.
It’s not meant to be fancy—just a tiny 2-hour project to get reliable data and a feel for how different PC817 batches respond.
The project data will be on Gitea – ToGo-Lab, Project ID 0002,

As working proof, some simple scope screenshots:

If you’re into optocouplers or small test circuits, feel free to build along or suggest tweaks.
Always happy to hear what others find useful in their own setups. 🙂

Controlling my Siglent SDG2042X from Linux

As part of rebuilding my electronics test bench for future projects at ToGo-Lab, I wanted a simple way to control my Siglent SDG2042X remotely from my Ubuntu box. So I wrote a small PyQt5 GUI script.

In its current state, the script lets you:

  • Select waveform, amplitude, frequency, and DC offset
  • Run sweeps, bursts, or arbitrary waveforms
  • Save and recall up to 10 presets (you can also recall directly from the generator)
  • Use the ARB Manager to download waveforms from the generator or upload new ones (not fully tested yet!) – it also shows the waveforms currently stored
  • Send direct SCPI commands through a built-in CLI
  • Grab screenshots from the generator display (saved in the same directory as the script)

Use it as-is or tweak it for your own setup. Programming in Python and PyQt5 isn’t my main profession -(I’m more of a hardware guy) so if you try it and find bugs (there will be some), I’d love to hear from you.

Script source and details: ToGo-Lab Git Repository

The program talks to the SDG2042X over a simple socket connection on port 5025 using SCPI commands. You can call the script with the -ip parameter (try also --help). This is handy if you launch it via a .desktop file.

The functions are straightforward, so there’s no detailed documentation yet. I hope most of the features are self-explanatory. Each GUI tab covers one main function. See more details in the Gitea repo:

  • Basic: Waveform, frequency, amplitude, offset, phase, and output control
  • Burst: Configure burst mode, trigger source, cycles, and delay
  • Sweep: Set up linear or logarithmic sweeps, start/stop frequency
  • ARB Manager: List, upload, and download arbitrary waveforms (still experimental)
  • SCPI CLI: The command-line interface for direct SCPI communication
  • Presets: Store and recall up to 10 custom setups; presets are saved in a text-based .dat file. This tab is especially useful: You can adjust settings directly on the generator, then read them back and save them as presets. The file is easy to edit manually if needed.

You can take screenshots at any time. They’re stored as .bmp files in the working directory, with the date and time included in the filename.


Update 2025-10-25

My SDG2042X Python control GUI keeps moving forward. Today I spent a lot of time reviewing and rewriting parts of the code. My focus was on stability & usability, and making the tool to fit better into my idea of a remote controlled test bench setup.

Today’s update:

Context-aware Basic Tab The parameter fields now change automatically depending on the selected waveform. So if you choose SINE, SQUARE, RAMP, PULSE, NOISE, ARB, or DC, you’ll only see the options that actually matter, others are grayed out.

Improved SCPI Reliability I added a new query_retry() function and a socket drain, which makes communication with the generator more reliable. This prevents annoying timeouts when running queries like OUTP? or BSWV?. The default socket timeout has also been set now to 4 seconds to give things a bit more breathing room (especially the screenshots are very slow). This makes it a little bit laggy but with shorter time I get sometimes errors. Adjust with care if you want a shorter response time.

Config System There’s now an SDG2042x.config file where you can define paths for presets and screenshots (simple text file). The pathes for presets and schreenshot directory are accessable from the “Config” tab.


Screenshot from 2025-10-25 15-45-33
Screenshot SDG2042X

Old meter (MXD-4660A), new tricks.

I pulled my veteran DMM, a Voltcraft MXD-4660A, from the drawer to set up my workbench (adding a serial-to-USB converter) and gave it a second tour of duty with QtDMM on Ubuntu. After a bit of searching online what to use under I found the QtDMM project at http://www.mtoussaint.de/qtdmm.htmlm , but appears abandoned. The active fork, I think, is at https://github.com/tuxmaster/QtDMM.

Here’s the final install and setup for my lab computer running Ubuntu 22.04 (Jammy):


Build & Install QtDMM on Ubuntu 22.04 (Jammy)


1) Prerequisites

  • Enable Universe and base tools:

    sudo apt update
    sudo apt install -y software-properties-common
    sudo add-apt-repository -y universe
    sudo apt update
  • Compilers, build tools, VCS:

    sudo apt install -y git build-essential cmake ninja-build pkg-config
  • Qt6 SDK

    sudo apt install -y qt6-base-dev qt6-tools-dev qt6-tools-dev-tools qt6-l10n-tools libqt6serialport6-dev
  • HID API

    sudo apt install -y libhidapi-dev libhidapi-hidraw0
  • OpenGL headers for Qt6Gui/Widgets

    sudo apt install -y libopengl-dev libgl1-mesa-dev libglu1-mesa-dev mesa-common-dev
  • Serial access without sudo:

    sudo usermod -aG dialout "$USER"
  • Log out and back in to apply group membership

2) Get the source and make the script executable

git clone https://github.com/tuxmaster/QtDMM.git
cd QtDMM
chmod +x compile.sh

3) Build

  • Clean build (optional). Also verifies prerequisites are present.
    ./compile.sh clean || true
    rm -rf build CMakeCache.txt CMakeFiles
    ./compile.sh
  • Artifacts land in ./bin/:
    ./bin/qtdmm --version
  • Verify it runs. If not, see Troubleshooting below

4) Install for all users (see §5 for a .deboption)

Preferred:

sudo ./compile.sh install
# now on PATH:
qtdmm --version

5) Alternative: make a .deb

Keeps your system clean and is easy to remove later.

./compile.sh pack
sudo apt install ./QtDMM_*amd64.deb

6) Uninstall

If installed via .deb:

sudo apt remove qtdmm

If installed via compile.sh install:

# run from the same build dir used for the install
sudo xargs rm < build/install_manifest.txt

Troubleshooting:

If you hit errors, try a clean build reset instead of first searching forums. I learned the hard way to make a clean install as a belt-and-suspenders reset, that deletes built objects but keeps the CMake cache.

  • “|| true” lets the sequence continue even if the clean step fails due to a broken config.
  • “rm -rf build CMakeCache.txt CMakeFiles” force-removes any stale out-of-source build dir and any accidental in-source CMake cache:
  • “Final ./compile.sh” does a fresh configure and build:
cd ~/QtDMM
./compile.sh clean || true
rm -rf build CMakeCache.txt CMakeFiles
./compile.sh

Let’s check if it’s running

  • As your regular user, start QtDMM from the command line or via the Ubuntu Dock (search for “QtDMM”):
  • Hint: How to create a Desktop shortcut launcher for ubuntu 22.04
    QtDMM - Running

  • Configure settings for MXD-4660A:
    Setup Voltcraft MXD-4660A

    Final test setup (send a known signal) and the result: MXD getting some imput from generator to prove reading
    QtDMM running, getting Data


Question to readers: Is there Linux software for the old Hameg HM1507-3? I’m currently using a Windows XP VM with very old software.